All topics
The network drive
Files and websites
Cameras and sensors
Trusted HTTPS on Your Own Network
On your own network the server also answers at its
.local name, with a certificate it creates itself. You install
that certificate once on each device you use, and connections at home are
HTTPS from then on, whether or not the internet is reachable.
The nas2.dk hostname gives you valid HTTPS at home on most networks with nothing to install, and it is the simpler option whenever it works. This page covers the situations where it cannot help: a network without an internet connection, or a router whose rebind protection strips the hostname.
A certificate you install yourself
No certificate authority issues certificates for .local names, so the server
signs this one itself and each device you use has to be told to trust it. You
install it once per device, in the same way companies do for their internal
servers.
Getting the certificate onto a device
Open Settings → Hostname on the server and tap the .local name listed under
Local. The screen shows a QR code that you scan with the camera of the other
device. It opens a page served by the server itself over plain http, which is
the one page that has to work before any trust exists, offering the
certificate in three formats along with install instructions for each
platform.
The QR code points at whichever address reaches the server from your network:
the LAN address you picked on the Serve tab, the .local name when you
picked nothing, and the raw IPv4 address when that name is known not to
resolve here. You can also use the share button on the screen to send the
certificate itself to a nearby Mac or iPhone with AirDrop, and it arrives
ready to install.
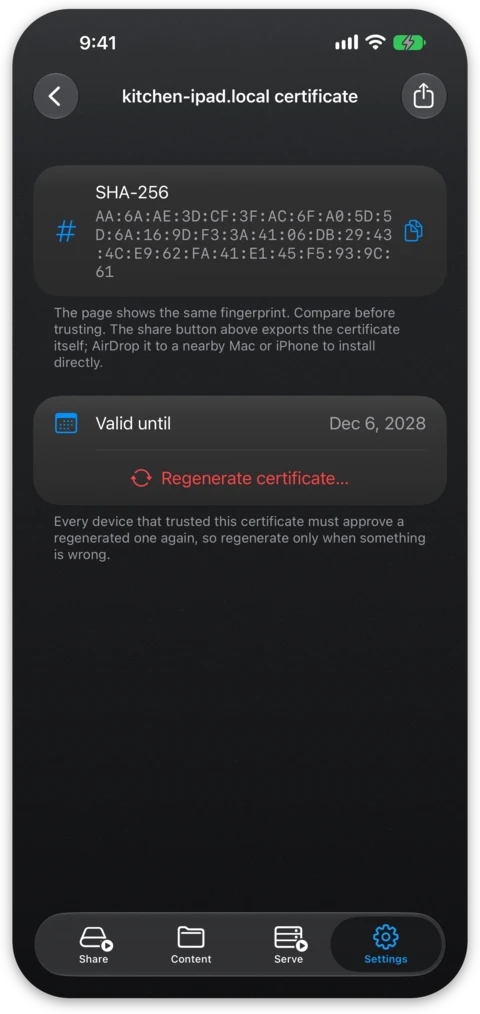
The screen and the page both show the SHA-256 fingerprint of the certificate. Compare the two before you install, so you know the certificate came from your server and not from somebody else on the network.
iPhone, iPad and Mac
Download the configuration profile using Safari, as other browsers cannot install profiles. On iPhone and iPad you then open Settings → Profile Downloaded and install it. The profile is listed as Not Signed in red, which is expected for a certificate the server generates itself, and the fingerprint vouches for it in place of a signature.
Installing the profile is not enough on its own. Go to Settings → General →
About → Certificate Trust Settings and enable the switch for the certificate,
or pages keep warning. iOS shows a stern warning at this point about what an
unrestricted certificate could do to your privacy. This one is constrained to
the .local names of the server and to private network addresses, so it
cannot vouch for anything on the internet.
On a Mac you install the downloaded profile in System Settings → Privacy & Security → Profiles. Should pages still warn afterwards, open Keychain Access, find the certificate and set Trust to Always Trust.
Android
Download the .crt file and install it under Settings → Security →
Encryption & credentials → Install a certificate → CA certificate, where the
wording varies between vendors. Chrome and most other browsers then trust the
server. Applications other than browsers ignore user-installed certificates
by design and are unaffected.
Windows
Download the .crt file, double-click it and choose Install Certificate….
Pick Local Machine as the store location and place the certificate in the
Trusted Root Certification Authorities store.
Firefox, Linux and the command line
Firefox keeps a certificate store of its own on every platform. Import the
certificate under Settings → Privacy & Security → Certificates, or accept the
exception Firefox offers for the site. Command-line tools take the .pem
download:
curl --cacert nas-reborn-ipad.pem https://ipad.local/
To trust the certificate system-wide on Linux, copy it into
/usr/local/share/ca-certificates/ and run sudo update-ca-certificates.
What the certificate covers
The certificate covers the .local names of the server and is valid for a
little over two years, which is the longest Apple accepts. Addresses are
covered as well, so https://192.168.8.251/ works from a device that
installed the certificate even where .local names do not resolve. The same
install covers that, and a new address from the network leaves the
certificate you installed untouched.
Public addresses are not covered. The constraints written into the
certificate stop at .local names and at private, unique-local and
link-local addresses, so an address literal such as https://[2001:db8::1]/
gets no certificate here. Reaching the server from outside your own network
is the job of the nas2.dk hostname and its
Let's Encrypt certificate.
Regenerating
Every device that installed the certificate must install the replacement when
the server regenerates it. The server therefore keeps the certificate it has
for as long as it can, and it regenerates when the certificate approaches the
end of its life, when a .local name the device needs to answer to is
missing from it, or when you use the Regenerate button on the certificate
screen. A new certificate carries the old names forward, but the
approvals do not survive it, so use the button when something is wrong with
the current certificate and not otherwise.